
The latest improvements & new capabilities in Fluint.
Product Updates


Build with the Playbooks Wizard
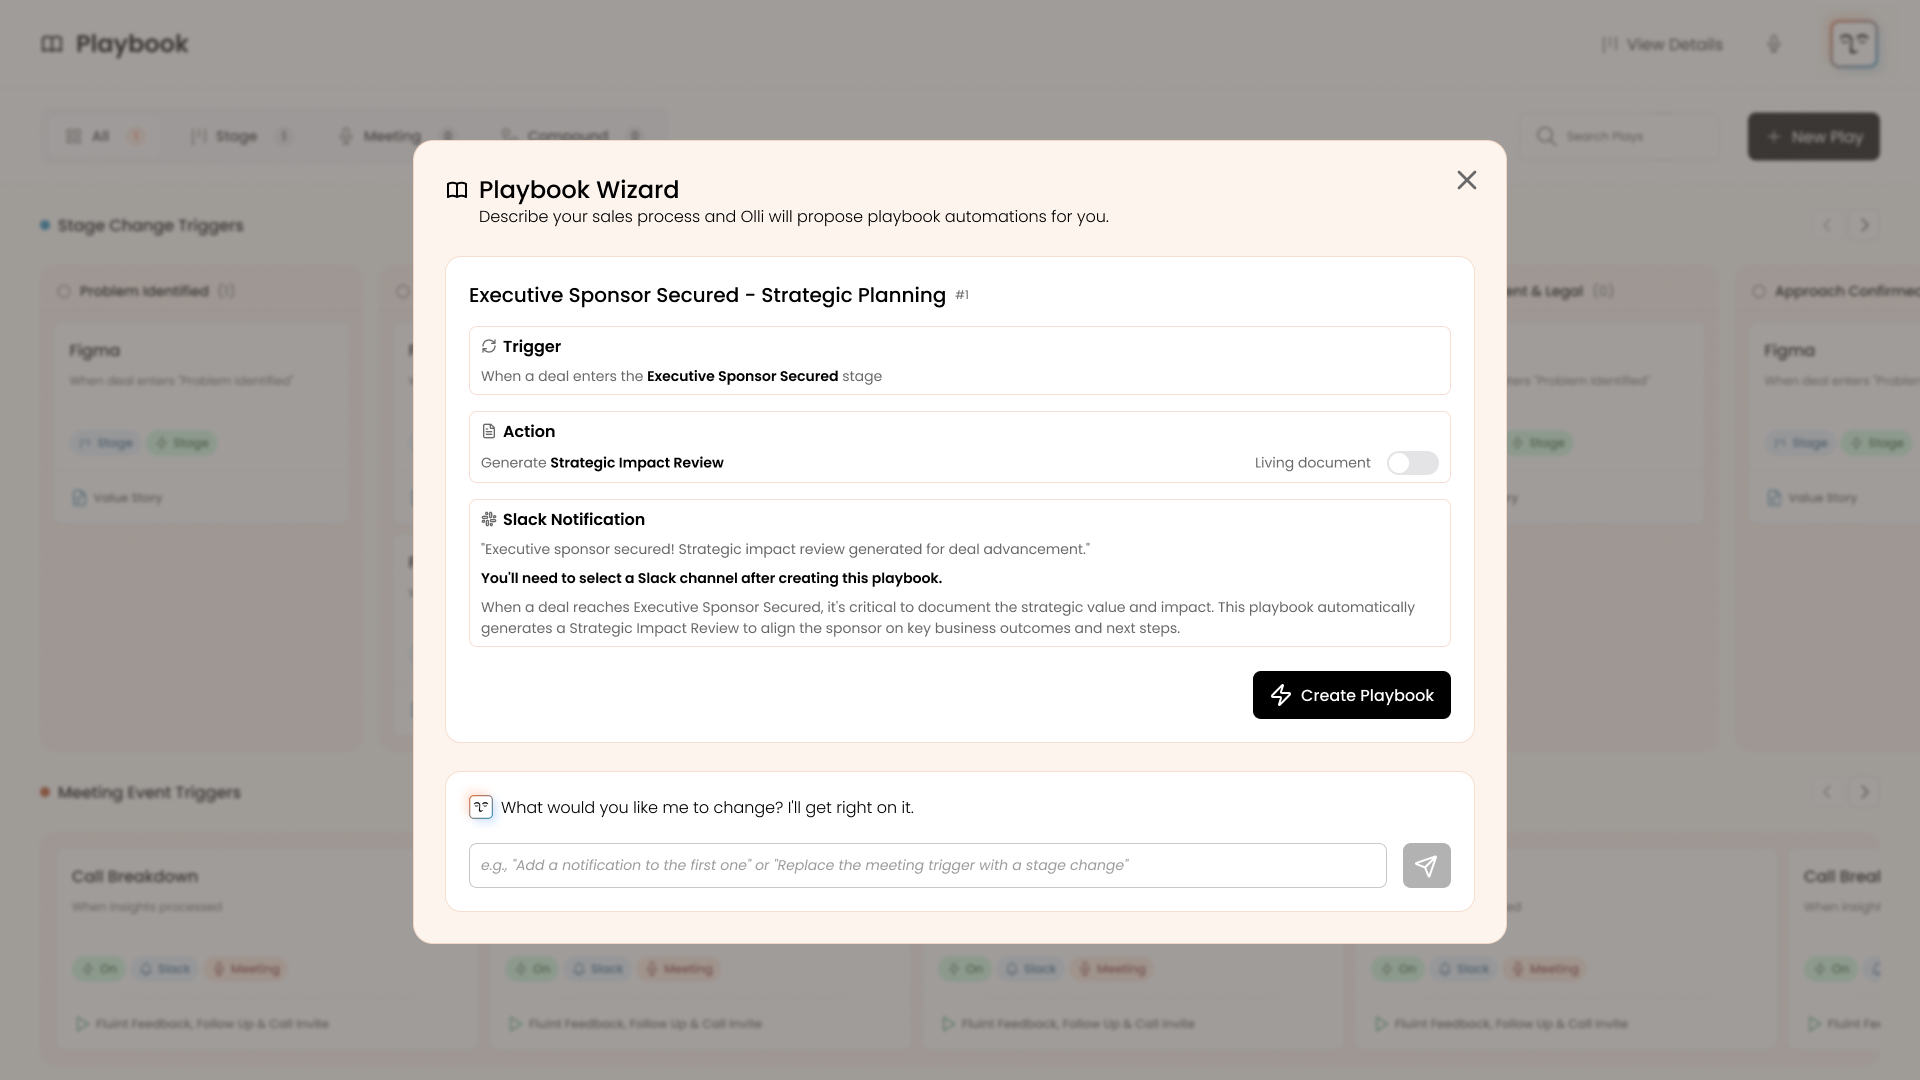
Describe what you want to automate and Olli builds the playbooks for you.
Why it matters
Setting up playbooks has always been the tax you pay before automation starts working. You know what you want — follow-ups after meetings, stage-based nudges, deal alerts — but translating that into configured triggers, actions, and notification rules means clicking through setup screens one at a time.
Now you just describe the outcome. Olli proposes a set of ready-to-go playbooks based on your org's actual stages, frameworks, and workflows. The gap between "I need this automated" and "it's running" collapses to a single conversation.
How it works
The Playbooks Wizard lets you describe what you want to automate in plain language or pick from suggested prompts. Olli generates 2–4 playbook proposals tailored to your org's configuration — each shown as an editable card with the trigger, actions, notification settings, and a rationale for why it's useful.
Before anything goes live, you can adjust each card inline: swap stages, frameworks, or workflows via dropdowns, toggle living documents, rename titles, and change notification channels. When a card looks right, click "Create Playbook" to activate it. Skip anything that doesn't fit, or send follow-up feedback and Olli regenerates proposals incorporating your changes.
Getting Started
You must be a Fluint admin to use the wizard when configuring playbooks for your org.
- Go to Playbooks in the sidebar
- Click "What playbooks can I help you create?" (or the wizard icon in the header if you already have playbooks)
- Describe what you want to automate, or pick a suggested prompt
- Review the proposal cards — edit triggers, actions, and notifications inline
- Click Create Playbook on each card you want to activate
- Send follow-up feedback to refine and Olli will update the proposals
Olli Does Your CRM Homework with Custom Field Mapping
Let Olli update MEDDPICC and Business Case fields for you.
Why it matters
CRM hygiene has always depended on rep discipline. Fields go stale, MEDDPICC is half-filled, Business Case status is guesswork, and leadership ends up enforcing process through nagging or brittle automation.
Custom Field Mapping flips that dynamic. Instead of asking reps to manually update opportunity fields, Olli writes the data for them. Your CRM reflects what’s actually happening in calls and documents, not what someone remembered to type in at 5:47pm.
This turns your CRM from a reporting graveyard into a living system of record, without adding admin overhead to your team.
How it works
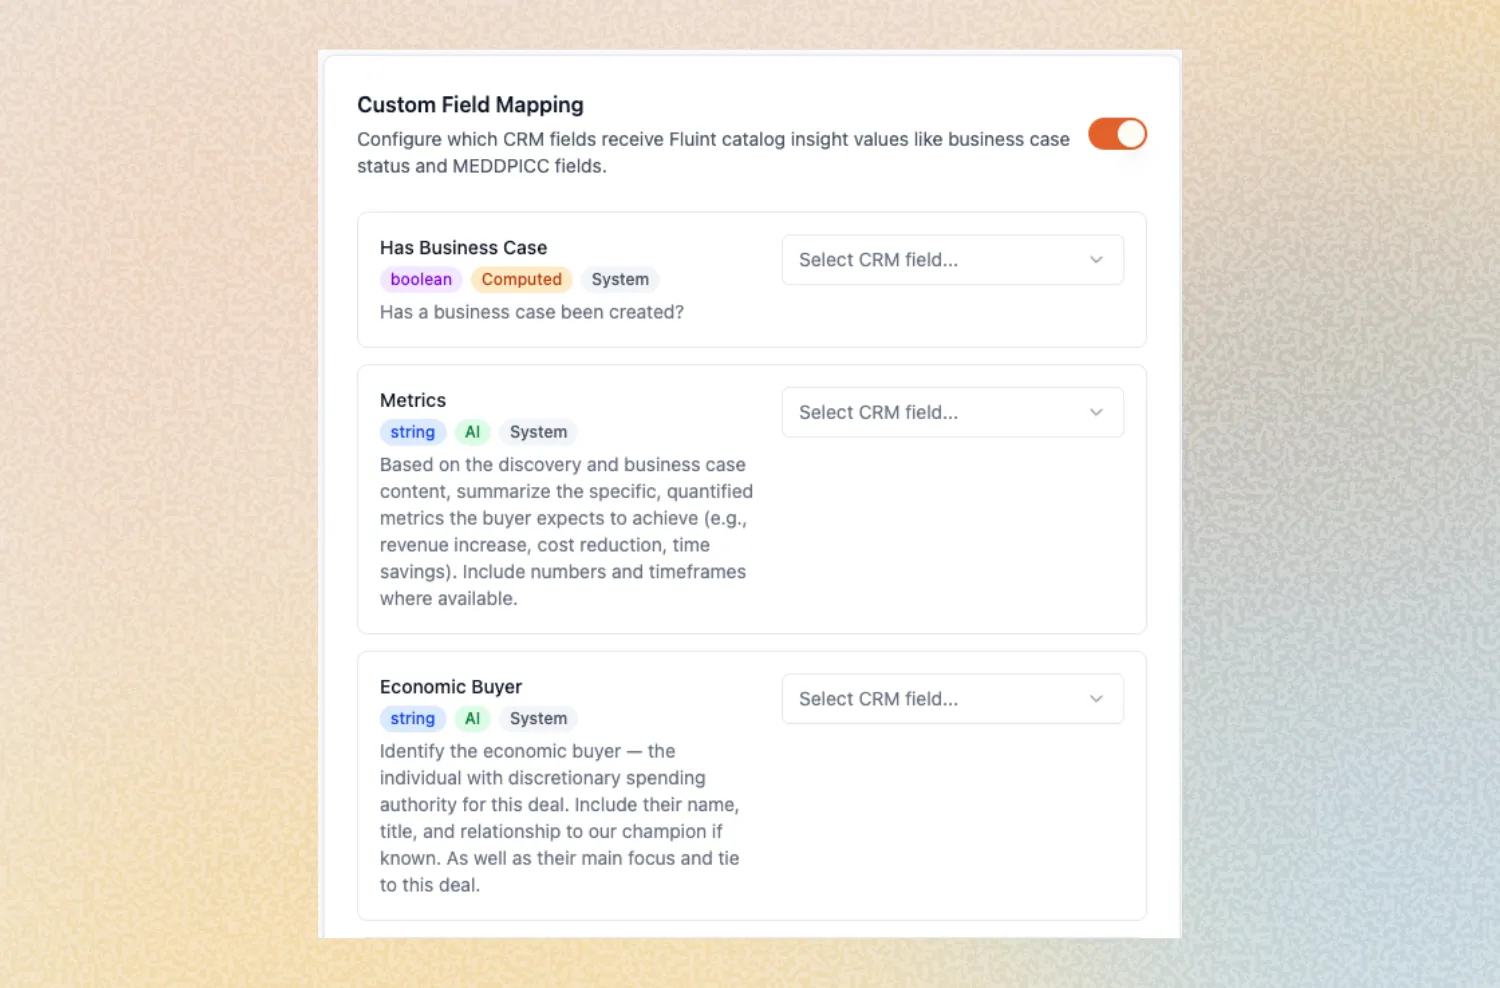
After every call or document update, Olli analyzes the deal and extracts structured insights. Those insights are automatically written into the CRM fields you choose inside Salesforce or HubSpot.
Business Case tracking becomes automatic. When Olli detects that a Business Case exists for a deal, it updates the mapped CRM field. This makes it possible to enforce real quality gates, like requiring a Business Case before a deal advances, without building complex automation or relying on manual policing.
Olli also extracts full MEDDPICC coverage from calls and documents and syncs each component to its corresponding CRM field. Instead of asking reps to “fill in MEDDPICC,” you get structured data based on actual deal conversations.
Beyond the built-in fields, you can create your own custom fields in Fluint. Define what matters to your process, map it to any existing CRM field using a simple dropdown, and Olli will keep it updated automatically.
A dedicated Custom Field Mapping section in Integration Settings shows all available Fluint fields alongside your CRM’s custom fields. You simply select what maps to what, save, and Olli handles the syncing from that point forward.
Getting Started
- Go to Settings → Integrations in Fluint.
- Scroll to the Custom Field Mapping section (you'll need an active Salesforce or HubSpot integration to see this).
- Toggle the feature on.
- For each Fluint field (Business Case, MEDDPICC components, or any custom fields you've created), use the dropdown to select which CRM field it should sync to.
- Click Save — Olli will begin syncing data to your CRM as deals are updated going forward.
- To add custom fields beyond the defaults, use the + Custom Fields button at the bottom to define new fields with a label, description, and value type.
Self-serve Integrations Setup
Connect your CRM and sales tools in minutes without implementation calls.
Why it matters
Integration setup has traditionally been a bottleneck—requiring support tickets, implementation calls, and days of back-and-forth just to get your tools connected. For revenue teams evaluating new software, this friction delays time-to-value and creates adoption risk. With self-serve setup, you can connect Salesforce, HubSpot, Gong, Salesloft, and Clari the moment you're ready, putting control back in your hands.
How it works
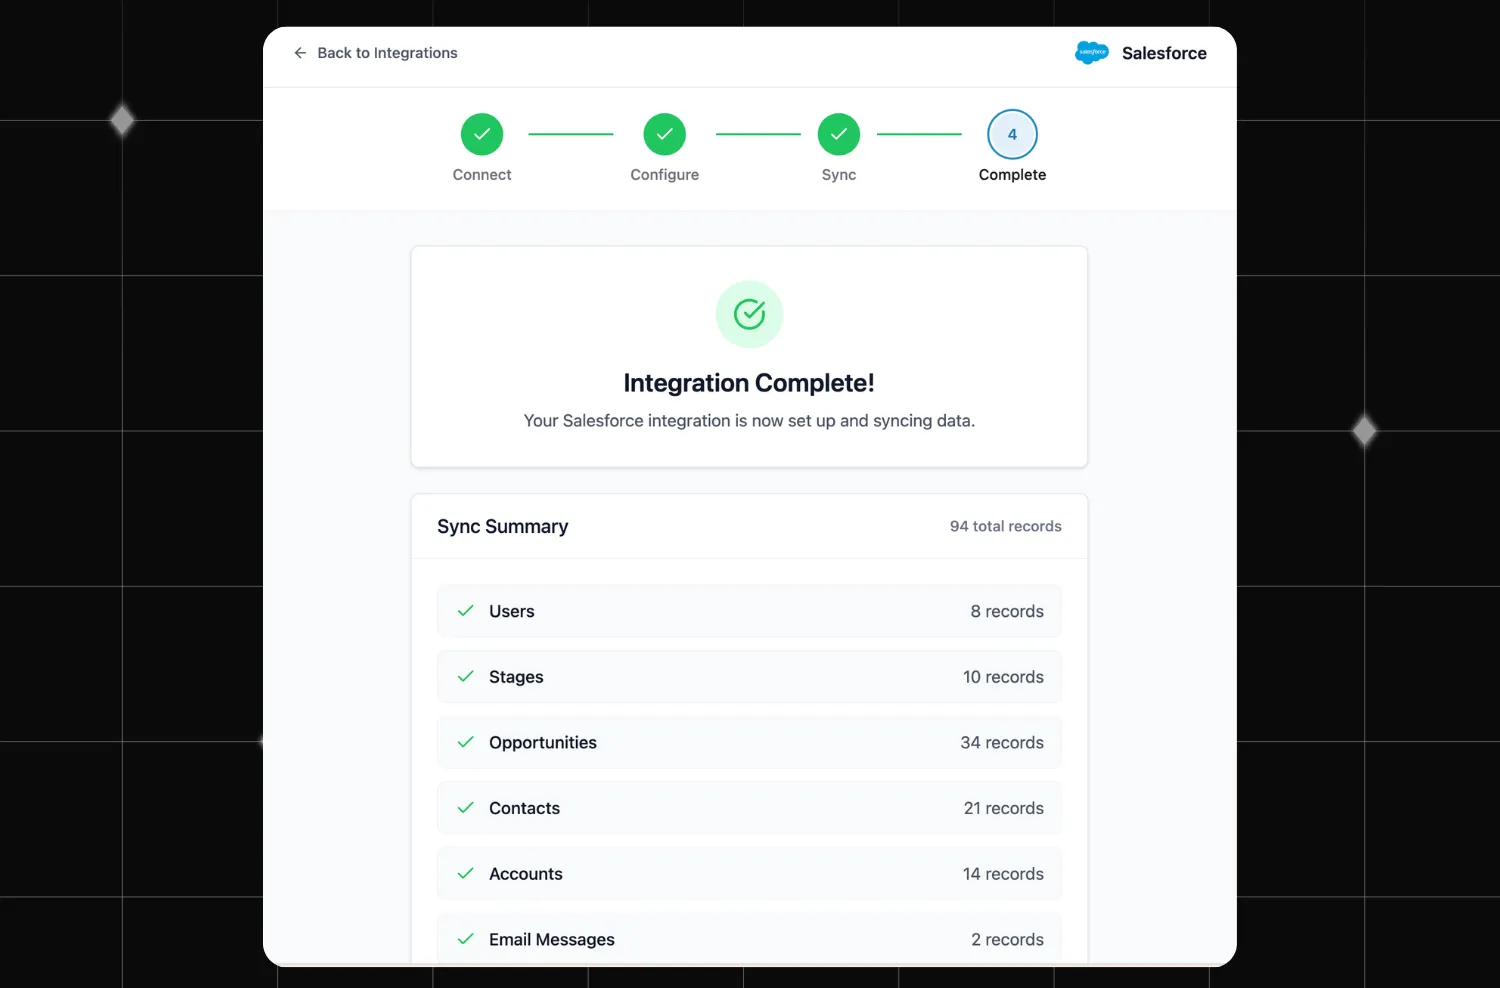
Fluint now provides a step-by-step setup wizard that guides you through connecting each integration with clear instructions at every stage—no more confusion about which settings to configure or what order to follow.
The platform handles data synchronization intelligently, syncing users first, then stages, then opportunities or deals automatically. This ensures your data arrives in the correct sequence without manual intervention.
During setup, you can configure filters to control which deals sync and specify record types that match your team's workflow. The entire process takes minutes and runs completely self-service—no implementation calls required.
Getting Started
You must be a Fluint Integrations admin to set-up these integrations for your org.
- Go to the Integrations page in your workspace
- Select the integration you want (Salesforce, HubSpot, Gong, Salesloft, or Clari)
- Follow the wizard through authentication and settings
- Configure your filters to match your team's needs
- Let the sync run—it handles everything in the right order
SSO & SCIM for Enterprise Teams
Single sign-on and automated user provisioning for enterprise teams.
Why it matters
Enterprise teams expect identity to “just work.” When login flows are clunky or user access is managed manually, it creates friction for employees and unnecessary overhead for admins. Security, compliance, and scale all suffer when identity isn’t centralized.
SSO and SCIM bring Fluint into your existing identity ecosystem. Your team can log in using the credentials they already trust, and admins can manage access automatically through their identity provider. This reduces onboarding friction, improves security posture, and ensures your Fluint workspace stays accurate as your org changes.
How it works
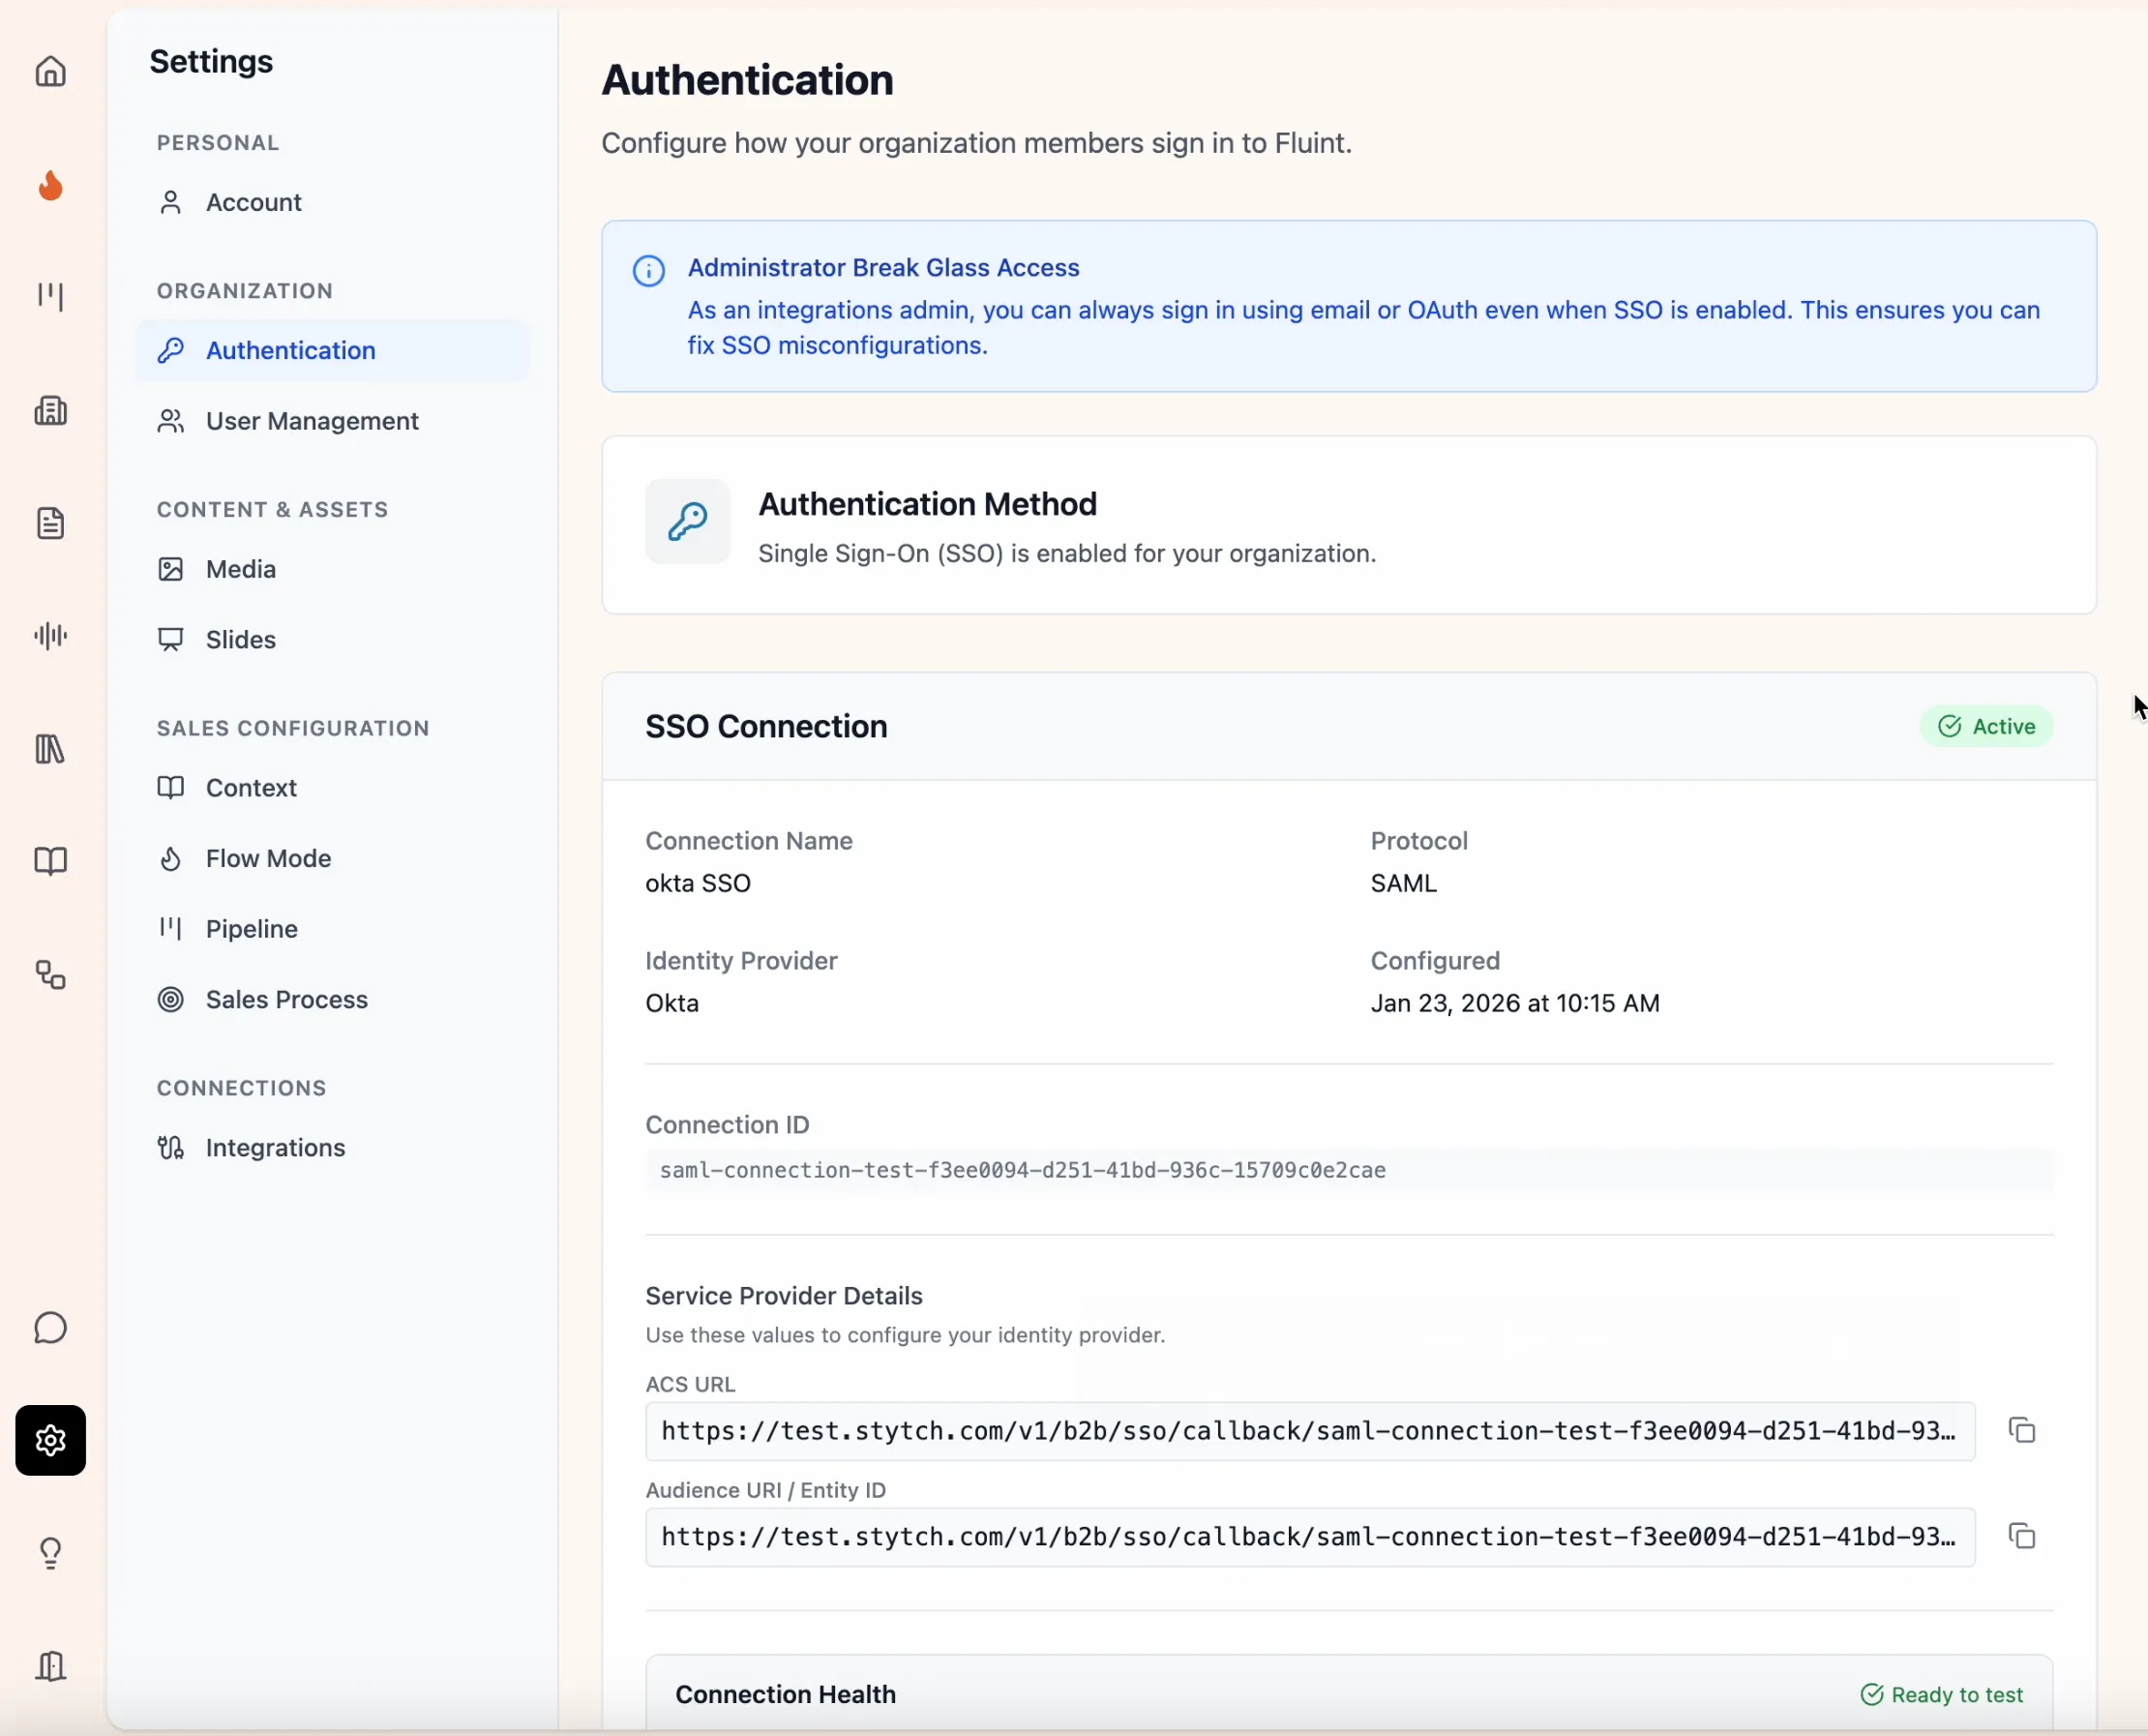
Fluint now supports SSO using SAML or OIDC, allowing users to authenticate through providers like Okta, Azure AD, or any compatible identity provider. Users simply enter their email and are routed automatically to the correct login flow, whether SSO is enabled or not.
Admins can configure SSO directly in Fluint settings without support tickets or custom setup. Once configured, Fluint generates a custom login URL that routes users straight to your identity provider and supports both direct login and IdP-initiated login from tools like Okta or Azure.
SCIM adds automated user provisioning on top of SSO. When connected, Fluint stays in sync with your identity provider automatically. New users are added, removed users lose access, and profile updates flow through without manual intervention. This keeps access clean and up to date as your organization evolves.
Getting Started
Setting up SSO
You must be a Fluint Integrations admin to set up SSO for your org.
- Go to Settings → Authentication in your Fluint workspace
- Select SSO and choose SAML or OIDC
- Add your identity provider details
- Test the connection to make sure it works
- Enable SSO for your organization
- Share your custom login URL with your team
Setting up SCIM (Optional)
SCIM automates user management and works alongside SSO. You must be a Fluint Integrations admin to configure SCIM.
- Go to Settings → Authentication → SCIM
- Generate your SCIM credentials (base URL and bearer token)
- Add these credentials to your identity provider's SCIM configuration
- Test the connection
- Enable SCIM provisioning
Once enabled, your identity provider will automatically create, update, and remove Fluint users based on changes in your IdP.

Extended Conversations with Olli
Work through complex deals in one continuous conversation, without hitting context limits.
Why it matters
Sales work doesn’t happen in short bursts. Deals sprawl across calls, docs, emails, and time. Hitting conversation limits mid-analysis breaks momentum and forces reps to start over or lose context.
With extended conversations, Olli can now stay with you longer—across deals, documents, and deep analysis—without cutting you off. That means fewer resets, better comparisons, and more time spent actually moving deals forward instead of managing tools.
You can think through complex situations in one place, the way you would with a real teammate who remembers what you talked about five minutes ago.
How it works
We rebuilt Olli’s memory management from the ground up so conversations scale with the work you’re doing:
- Cross-deal conversations
Compare Deal X to Deal Y in a single thread. Olli can now reason across multiple deals, documents, or transcripts without running out of context. - Smart compression, full fidelity
Olli intelligently compresses large results behind the scenes, keeping everything accessible when needed. You won’t notice the system working—you’ll just notice the conversation keeps going. - Much longer chats
Dive deep into complex topics without hitting context limits. Olli now manages what it remembers so you can stay focused instead of restarting. - Works everywhere
The same extended conversations work in Fluint and in Slack. Same memory, same results, no matter where you’re chatting.
Getting started
There’s nothing to set up. Just start chatting. You’ll automatically get longer conversations, fewer interruptions, and the ability to work across multiple deals or documents at once.
Olli’s got more stamina now—use it.
CRM Account View
Group deals by account and let Olli help you think at the relationship level.
Why it matters
Deals don’t live in isolation. Real revenue comes from managing relationships across multiple opportunities, stakeholders, and conversations. When everything is organized only at the deal level, it’s easy to miss risk, lose context, or optimize one deal at the expense of the bigger account.
The CRM Account View gives you a full picture of each account in one place. Instead of juggling scattered deals, you can see how opportunities connect, understand account-level risk, and think strategically about the entire relationship. Olli can now help you zoom out, spot patterns, and plan at the account level instead of one deal at a time.
How it works
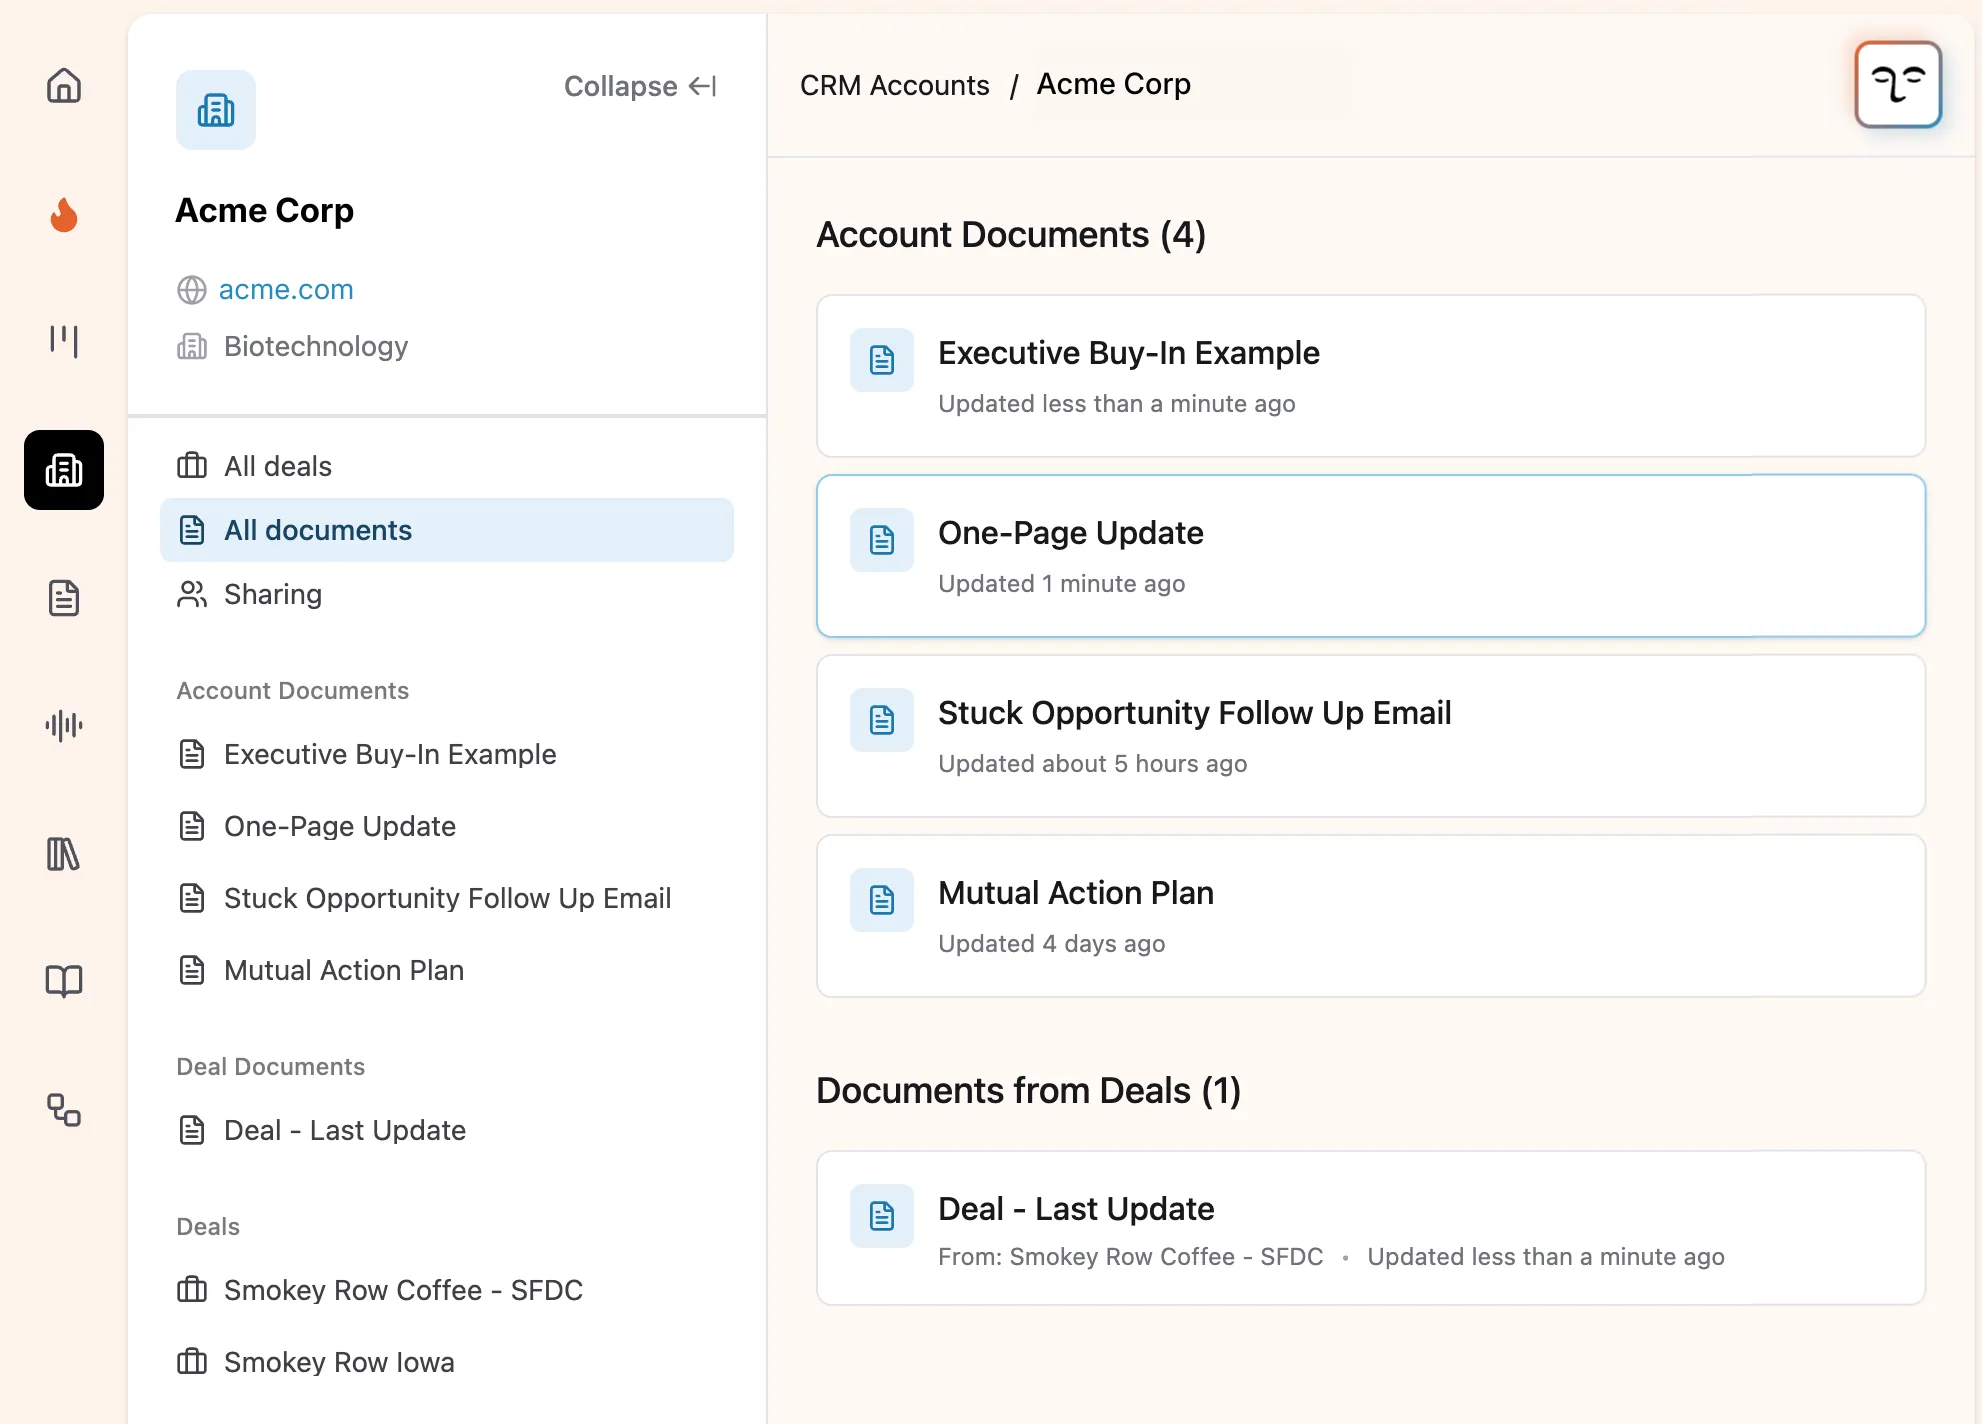
The new CRM Account View groups all related opportunities under a single account, so you can see every active deal, document, and insight tied to that customer in one place.
You can reference any account directly in Olli by typing @ followed by the account name. From there, you can draft account plans, analyze risks across deals, or ask questions about the overall relationship instead of a single opportunity.
You can also create documents at the account level, not just for individual deals. This makes it easier to build account plans, business cases, or executive summaries that span multiple opportunities and stay aligned as deals progress.
Getting started
- Navigate to CRM Accounts from the left-hand navigation. Browse accounts and click into one to see all linked deals and documents.
- To work with an account in Olli, type @ and select the account name to ask questions or generate account-level insights.
- You can create account-level documents either from the account detail page or directly through Olli.
*Please note that your CRM integration must be set up by a Fluint workspace admin.

Let’s see if there’s a good fit
We’ll look at how other GTM teams are already: